Introduction :
Creating a calculator application for mobile is an interesting and challenging project. Using the Android Studio IDE, you can create a simple calculator application for Android phones. In this article, I shall explore you how to build a simple calculator application using the Android Studio IDE. Here, you can create a functional calculator application that can perform basic arithmetic operations such as addition, subtraction, multiplication and division.
What is calculator :
A calculator is a device or tool that used for calculating mathematical operations like addition, subtraction, multiplication, division and more. There are different type of calculator we can see such as physical device, a software application on a computer or phone, or an embedded calculator in electronic devices. The primary purpose of a calculator is to calculate various mathematical problem.
There are different buttons in the calculator which represent digits (0-9), arithmetic operators (+, -, *, /) and additional functions such as square root, exponentiation, trigonometric functions etc. Using these buttons, users can input numerical values with operations. Then the calculator displays the result of the computation on the screen (display area).
There are various types of calculators you can see such as basic calculator, scientific calculator, financial calculator, graphing calculator etc.
About the application :
This is a simple calculator build using the Android Studio IDE. When you run the project and install the app on your Android phone, you can see a basic calculator on your phone. In the calculator app, you can perform addition, subtraction, multiplication and division of any numbers. You can also calculate decimal numbers in the calculator app. If you face some problem in the calculator, please forgive me. You can fix the problem in your app and make the app more usable for users.
Step for create the application :
Follow the below step-by-step process to create the calculator application in your pc.
Step 1 :
Now, open the Android Studio on your pc. Then, create a new project with empty activity for calculator app. Here, give a name of the project such as “Calculatorexample”. Do you know how to create Android app, if not follow the link.
Step 2 :
When your project is opened on your pc, open the activity_main.xml file and replace the default code with the following code.
<?xml version="1.0" encoding="utf-8"?>
<LinearLayout xmlns:android="http://schemas.android.com/apk/res/android"
    xmlns:app="http://schemas.android.com/apk/res-auto"
    xmlns:tools="http://schemas.android.com/tools"
    android:layout_width="match_parent"
    android:layout_height="match_parent"
    android:background="#f51616"
    tools:context=".MainActivity"
    android:orientation="vertical">
    <LinearLayout
        android:layout_width="match_parent"
        android:layout_height="match_parent"
        android:orientation="vertical">
        <TextView
            android:layout_width="match_parent"
            android:layout_gravity="fill_horizontal"
            android:background="#f5c516"
            android:layout_height="60dp"
            android:id="@+id/t"
            android:textColor="#FBFBFB"
            android:gravity="left|bottom"
            android:textSize="30sp"
            android:layout_marginBottom="10dp"
            android:text="0"
            />
        <GridLayout
            android:layout_width="wrap_content"
            android:layout_height="wrap_content"
            android:padding="10sp"
            android:background="#f51616"
            android:columnCount="3">
            <Button
                android:id="@+id/b1"
                android:layout_width="wrap_content"
                android:layout_height="wrap_content"
                android:layout_row="0"
                android:layout_column="0"
                android:layout_margin="10dp"
                android:background="#1cda29"
                android:onClick="press1"
                android:text="1"
                android:textSize="30dp" />
            <Button
                android:background="#1cda29"
                android:textSize="30dp"
                android:layout_margin="10dp"
                android:layout_column="1"
                android:layout_row="0"
                android:onClick="press2"
                android:id="@+id/b2"
                android:text="2"
                android:layout_width="wrap_content"
                android:layout_height="wrap_content" />
            <Button
                android:onClick="press3"
                android:background="#1cda29"
                android:id="@+id/b3"
                android:textSize="30dp"
                android:layout_margin="10dp"
                android:layout_column="2"
                android:layout_row="0"
                android:text="3"
                android:layout_width="wrap_content"
                android:layout_height="wrap_content" />
            <Button
                android:background="#1cda29"
                android:onClick="press4"
                android:id="@+id/b4"
                android:layout_column="0"
                android:layout_margin="10dp"
                android:layout_row="1"
                android:text="4"
                android:textSize="30dp"
                android:layout_width="wrap_content"
                android:layout_height="wrap_content" />
            <Button
                android:onClick="press5"
                android:background="#1cda29"
                android:id="@+id/b5"
                android:layout_column="1"
                android:layout_row="1"
                android:text="5"
                android:textSize="30dp"
                android:layout_margin="10dp"
                android:layout_width="wrap_content"
                android:layout_height="wrap_content" />
            <Button
                android:onClick="press6"
                android:background="#1cda29"
                android:id="@+id/b6"
                android:text="6"
                android:textSize="30dp"
                android:layout_column="2"
                android:layout_row="1"
                android:layout_margin="10dp"
                android:layout_width="wrap_content"
                android:layout_height="wrap_content" />
            <Button
                android:background="#1cda29"
                android:onClick="press7"
                android:id="@+id/b7"
                android:layout_column="0"
                android:layout_margin="10dp"
                android:layout_row="2"
                android:textSize="30dp"
                android:text="7"
                android:layout_width="wrap_content"
                android:layout_height="wrap_content" />
            <Button
                android:onClick="press8"
                android:background="#1cda29"
                android:id="@+id/b8"
                android:layout_column="1"
                android:layout_row="2"
                android:text="8"
                android:textSize="30dp"
                android:layout_margin="10dp"
                android:layout_width="wrap_content"
                android:layout_height="wrap_content" />
            <Button
                android:background="#1cda29"
                android:onClick="press9"
                android:id="@+id/b9"
                android:layout_column="2"
                android:layout_row="2"
                android:textSize="30dp"
                android:text="9"
                android:layout_margin="10dp"
                android:layout_width="wrap_content"
                android:layout_height="wrap_content" />
            <Button
                android:background="#1cda29"
                android:onClick="press0"
                android:id="@+id/b0"
                android:layout_column="0"
                android:layout_row="3"
                android:textSize="30dp"
                android:text="0"
                android:layout_margin="10dp"
                android:layout_width="wrap_content"
                android:layout_height="wrap_content" />
            <Button
                android:background="#1cda29"
                android:onClick="point"
                android:id="@+id/point"
                android:layout_column="1"
                android:layout_row="3"
                android:textSize="30dp"
                android:text="."
                android:layout_margin="10dp"
                android:layout_width="wrap_content"
                android:layout_height="wrap_content" />
            <Button
                android:background="#0919f2"
                android:id="@+id/plass"
                android:text="+"
                android:layout_column="2"
                android:layout_row="3"
                android:textColor="#FBFBFB"
                android:textSize="40dp"
                android:layout_margin="10dp"
                android:layout_width="wrap_content"
                android:layout_height="wrap_content" />
            <Button
                android:id="@+id/minus"
                android:background="#0919f2"
                android:layout_toRightOf="@+id/plass"
                android:text="-"
                android:layout_column="0"
                android:layout_row="4"
                android:layout_margin="10dp"
                android:textColor="#FBFBFB"
                android:textSize="40dp"
                android:layout_width="wrap_content"
                android:layout_height="wrap_content" />
            <Button
                android:background="#0919f2"
                android:id="@+id/multy"
                android:text="×"
                android:layout_column="1"
                android:layout_row="4"
                android:layout_margin="10dp"
                android:textColor="#FBFBFB"
                android:textSize="40dp"
                android:layout_width="wrap_content"
                android:layout_height="wrap_content" />
            <Button
                android:background="#0919f2"
                android:id="@+id/div"
                android:text="÷"
                android:layout_column="2"
                android:layout_row="4"
                android:textColor="#FBFBFB"
                android:textSize="40dp"
                android:layout_margin="10dp"
                android:layout_width="wrap_content"
                android:layout_height="wrap_content" />
            <Button
                android:layout_gravity="right"
                android:onClick="ac"
                android:id="@+id/ac"
                android:layout_margin="10dp"
                android:layout_column="0"
                android:layout_row="5"
                android:text="A/C"
                android:textColor="#FBFBFB"
                android:textSize="40dp"
                android:background="#1c2fda"
                android:layout_width="wrap_content"
                android:layout_height="wrap_content" />
            <Button
                android:background="#eaebf1"
                android:id="@+id/equal"
                android:text="="
                android:layout_column="1"
                android:layout_row="5"
                android:textColor="#F60707"
                android:textSize="40dp"
                android:layout_margin="10dp"
                android:layout_width="wrap_content"
                android:layout_height="wrap_content" />
        </GridLayout>
    </LinearLayout>
</LinearLayout>
Step 3 :
After that, open the MainActivity.java file and replace the default code with the following code. You must be keep the first line same as your default code such as “package com.example.Calculatorexample;”.
package com.example.calculatorexample;

import android.support.v7.app.AppCompatActivity;
import android.os.Bundle;
import android.view.View;
import android.widget.Button;
import android.widget.TextView;

public class MainActivity extends AppCompatActivity {
    TextView textView;
    Button p,mi,mu,d,e;
    float num=0,i1=0;
    int int_num=0;
    int m=0,n=0;
    @Override
    protected void onCreate(Bundle savedInstanceState) {
        super.onCreate(savedInstanceState);
        setContentView(R.layout.activity_main);
        textView=(TextView)findViewById(R.id.t);
        p=(Button)findViewById(R.id.plass);
        mi=(Button)findViewById(R.id.minus);
        mu=(Button)findViewById(R.id.multy);
        d=(Button)findViewById(R.id.div);
        e=(Button)findViewById(R.id.equal);
        click c=new click(this);
        p.setOnClickListener(c);
        mi.setOnClickListener(c);
        mu.setOnClickListener(c);
        d.setOnClickListener(c);
        e.setOnClickListener(c);
    }
    public void press1(View view) {
            if(click.a==0){
            if(m==0){
                num=num*10+1;
                 }
            else {
                n++;
                num = (float) ((num * Math.pow(10, n) + 1) / Math.pow(10, n));
            }
        }
        if(click.k1==0)
        i1=num;
        int_num= (int) num;
        if (click.k1==1)
        {
            if(int_num==num)
            textView.setText(click.s+String.valueOf((int)num));
            else
                textView.setText(click.s+String.valueOf(num));
        }
        else {
            if(m==1){
                textView.setText(String.valueOf(num));
            }
            else
                textView.setText(String.valueOf((int)num));
        }
    }
    public void press2(View view) {
        if(click.a==0){
            if(m==0){
                num=num*10+2;
            }
            else {
                n++;
                num = (float) ((num * Math.pow(10, n) + 2) / Math.pow(10, n));
            }
        }
        if(click.k1==0)
        i1=num;
        int_num= (int) num;
        if (click.k1==1)
        {
            if(int_num==num)
                textView.setText(click.s+String.valueOf((int)num));
            else
                textView.setText(click.s+String.valueOf(num));
        }
        else {
            if(m==1){
                textView.setText(String.valueOf(num));
            }
            else
                textView.setText(String.valueOf((int)num));
        }
    }
    public void press3(View view) {
        if(click.a==0){
            if(m==0){
                num=num*10+3;
            }
            else {
                n++;
                num = (float) ((num * Math.pow(10, n) + 3) / Math.pow(10, n));
            }
        }
        if(click.k1==0)
        i1=num;
        int_num= (int) num;
        if (click.k1==1)
        {
            if(int_num==num)
                textView.setText(click.s+String.valueOf((int)num));
            else
                textView.setText(click.s+String.valueOf(num));
        }
        else {
            if(m==1){
                textView.setText(String.valueOf(num));
            }
            else
                textView.setText(String.valueOf((int)num));
        }
    }
    public void press4(View view) {
        if(click.a==0){
            if(m==0){
                num=num*10+4;
            }
            else {
                n++;
                num = (float) ((num * Math.pow(10, n) + 4) / Math.pow(10, n));
            }
        }
        if(click.k1==0)
            i1=num;
        int_num= (int) num;
        if (click.k1==1)
        {
            if(int_num==num)
                textView.setText(click.s+String.valueOf((int)num));
            else
                textView.setText(click.s+String.valueOf(num));
        }
        else {
            if(m==1){
                textView.setText(String.valueOf(num));
            }
            else
                textView.setText(String.valueOf((int)num));
        }
    }
    public void press5(View view) {
        if(click.a==0){
            if(m==0){
                num=num*10+5;
            }
            else {
                n++;
                num = (float) ((num * Math.pow(10, n) + 5) / Math.pow(10, n));
            }
        }
        if(click.k1==0)
        i1=num;
        int_num= (int) num;
        if (click.k1==1)
        {
            if(int_num==num)
                textView.setText(click.s+String.valueOf((int)num));
            else
                textView.setText(click.s+String.valueOf(num));
        }
        else {
            if(m==1){
                textView.setText(String.valueOf(num));
            }
            else
                textView.setText(String.valueOf((int)num));
        }
    }
    public void press6(View view) {
        if(click.a==0){
            if(m==0){
                num=num*10+6;
            }
            else {
                n++;
                num = (float) ((num * Math.pow(10, n) + 6) / Math.pow(10, n));
            }
        }
        if(click.k1==0)
        i1=num;
        int_num= (int) num;
        if (click.k1==1)
        {
            if(int_num==num)
                textView.setText(click.s+String.valueOf((int)num));
            else
                textView.setText(click.s+String.valueOf(num));
        }
        else {
            if(m==1){
                textView.setText(String.valueOf(num));
            }
            else
                textView.setText(String.valueOf((int)num));
        }
    }
    public void press7(View view) {
        if(click.a==0){
            if(m==0){
                num=num*10+7;
            }
            else {
                n++;
                num = (float) ((num * Math.pow(10, n) + 7) / Math.pow(10, n));
            }
        }
        if(click.k1==0)
        i1=num;
        int_num= (int) num;
        if (click.k1==1)
        {
            if(int_num==num)
                textView.setText(click.s+String.valueOf((int)num));
            else
                textView.setText(click.s+String.valueOf(num));
        }
        else {
            if(m==1){
                textView.setText(String.valueOf(num));
            }
            else
                textView.setText(String.valueOf((int)num));
        }
    }
    public void press8(View view) {
        if(click.a==0){
            if(m==0){
                num=num*10+8;
            }
            else {
                n++;
                num = (float) ((num * Math.pow(10, n) + 8) / Math.pow(10, n));
            }
        }
        if(click.k1==0)
        i1=num;
        int_num= (int) num;
        if (click.k1==1)
        {
            if(int_num==num)
                textView.setText(click.s+String.valueOf((int)num));
            else
                textView.setText(click.s+String.valueOf(num));
        }
        else {
            if(m==1){
                textView.setText(String.valueOf(num));
            }
            else
                textView.setText(String.valueOf((int)num));
        }
    }
    public void press9(View view) {
        if(click.a==0){
            if(m==0){
                num=num*10+9;
            }
            else {
                n++;
                num = (float) ((num * Math.pow(10, n) + 9) / Math.pow(10, n));
            }
        }
        if(click.k1==0)
        i1=num;
        int_num= (int) num;
        if (click.k1==1)
        {
            if(int_num==num)
                textView.setText(click.s+String.valueOf((int)num));
            else
                textView.setText(click.s+String.valueOf(num));
        }
        else {
            if(m==1){
                textView.setText(String.valueOf(num));
            }
            else
                textView.setText(String.valueOf((int)num));
        }
    }
    public void press0(View view) {
        if(click.a==0){
            if(m==0){
                num=num*10+0;
            }
            else {
                n++;
                num = (float) ((num * Math.pow(10, n) + 0) / Math.pow(10, n));
            }
        }
        if(click.k1==0)
        i1=num;
        int_num= (int) num;
        if (click.k1==1)
        {
            if(int_num==num)
                textView.setText(click.s+String.valueOf((int)num));
            else
                textView.setText(click.s+String.valueOf(num));
        }
        else {
            if(m==1){
                textView.setText(String.valueOf(num));
            }
            else
                textView.setText(String.valueOf((int)num));
        }
    }
    public void ac(View view) {

        int_num=0;
        num=0;
        i1=0;
        click.k1=0;
        click.s="";
        click.eq=0;
        click.a=0;
        m=0;
        n=0;
        textView.setText(String.valueOf((int)num));
    }
    public void point(View view) {
        if (click.k1==1)
            textView.setText(click.s+String.valueOf(num));
        else
        textView.setText(String.valueOf(num));
        m=1;
    }
}
Step 4 :
At last, create a java file such as “click.java”.For creating java class you have to click on “File”, then go to “New” and click on “Java Class”. Here you name it “click” and press “Enter” key. Now, keep the first line same as “package com.example.Calculatorexample;” and replace the other code with below code.
package com.example.calculatorexample;

import android.view.View;
public class click implements View.OnClickListener {
    MainActivity mainActivity;
    int k=0;
    float num2;
    int num3;
    static int k1=0,eq=0, a=0;
    static String s;
    public click(MainActivity mainActivity) {
        this.mainActivity=mainActivity;
    }
    @Override
    public void onClick(View v) {
        if(v.getId()==R.id.plass&&k==0)
        {
            mainActivity.i1=mainActivity.num;
            mainActivity.num=0;
            k=1;
            k1=1;
            a=0;
            mainActivity.n=0;
            mainActivity.m=0;
            num3= (int) mainActivity.i1;
            if(num3==mainActivity.i1)
            s=String.valueOf((int)mainActivity.i1)+" + ";
            else
                s=String.valueOf(mainActivity.i1)+" + ";
            if(num3==mainActivity.i1)
                mainActivity.textView.setText(String.valueOf((int)mainActivity.i1)+" + ");
                 else
            mainActivity.textView.setText(String.valueOf(mainActivity.i1)+" + ");
        }
        if(v.getId()==R.id.minus&&k==0)
        {
            mainActivity.i1=mainActivity.num;
            mainActivity.num=0;
            k=2;
            k1=1;
            a=0;
            mainActivity.m=0;
            mainActivity.n=0;
            num3= (int) mainActivity.i1;
            if(num3==mainActivity.i1)
                s=String.valueOf((int)mainActivity.i1)+" - ";
            else
                s=String.valueOf(mainActivity.i1)+" - ";
            if(num3==mainActivity.i1)
                mainActivity.textView.setText(String.valueOf((int)mainActivity.i1)+" - ");
            else
                mainActivity.textView.setText(String.valueOf(mainActivity.i1)+" - ");
        }
        if(v.getId()==R.id.multy&&k==0)
        {
            mainActivity.i1=mainActivity.num;
            mainActivity.num=0;
            k=3;
            k1=1;
            a=0;
            mainActivity.m=0;
            mainActivity.n=0;
            num3= (int) mainActivity.i1;
            if(num3==mainActivity.i1)
                s=String.valueOf((int)mainActivity.i1)+" × ";
            else
                s=String.valueOf(mainActivity.i1)+"×";
            if(num3==mainActivity.i1)
                mainActivity.textView.setText(String.valueOf((int)mainActivity.i1)+" × ");
            else
                mainActivity.textView.setText(String.valueOf(mainActivity.i1)+" × ");
        }
        if(v.getId()==R.id.div&&k==0)
        {
            mainActivity.i1=mainActivity.num;
            mainActivity.num=0;
            k=4;
            k1=1;
            a=0;
            mainActivity.m=0;
            mainActivity.n=0;
            num3= (int) mainActivity.i1;
            if(num3==mainActivity.i1)
                s=String.valueOf((int)mainActivity.i1)+" ÷ ";
            else
                s=String.valueOf(mainActivity.i1)+" ÷ ";
            if(num3==mainActivity.i1)
                mainActivity.textView.setText(String.valueOf((int)mainActivity.i1)+" ÷ ");
            else
                mainActivity.textView.setText(String.valueOf(mainActivity.i1)+" ÷ ");
        }
        if(v.getId()==R.id.equal&&k==1) {
            if(eq==1){
                mainActivity.i1=num2;
            }
            mainActivity.num = mainActivity.i1 + mainActivity.num;

            num2=mainActivity.num;
            eq=1;
            k=0;
            mainActivity.m=0;
            mainActivity.n=0;
            num3= (int) mainActivity.num;
            if(num3==mainActivity.num)
            mainActivity.textView.setText(String.valueOf((int)mainActivity.num));
            else
                mainActivity.textView.setText(String.valueOf(mainActivity.num));
            click.s="";
            a=1;
        }
        if(v.getId()==R.id.equal&&k==2) {
            if(eq==1){
                mainActivity.i1=num2;
            }
            mainActivity.num = mainActivity.i1 - mainActivity.num;
            num2=mainActivity.num;
            eq=1;
            k=0;
            mainActivity.m=0;
            mainActivity.n=0;
            num3= (int) mainActivity.num;
            if(num3==mainActivity.num)
                mainActivity.textView.setText(String.valueOf((int)mainActivity.num));
            else
                mainActivity.textView.setText(String.valueOf(mainActivity.num));
            click.s="";
            a=1;
        }
        if(v.getId()==R.id.equal&&k==3) {
            if(eq==1){
                mainActivity.i1=num2;
            }
            mainActivity.num = mainActivity.i1 * mainActivity.num;
            num2=mainActivity.num;
            eq=1;
            k=0;
            mainActivity.n=0;
            mainActivity.m=0;
            num3= (int) mainActivity.num;
            if(num3==mainActivity.num)
                mainActivity.textView.setText(String.valueOf((int)mainActivity.num));
            else
                mainActivity.textView.setText(String.valueOf(mainActivity.num));
            click.s="";
            a=1;
        }
        if(v.getId()==R.id.equal&&k==4) {
            if(eq==1){
                mainActivity.i1=num2;
            }
            mainActivity.num = mainActivity.i1 / mainActivity.num;
            num2=mainActivity.num;
            eq=1;
            k=0;
            mainActivity.m=0;
            mainActivity.n=0;

            num3= (int) mainActivity.num;
            if(num3==mainActivity.num)
                mainActivity.textView.setText(String.valueOf((int)mainActivity.num));
            else
                mainActivity.textView.setText(String.valueOf(mainActivity.num));
            click.s="";
            a=1;
        }
    }
}
Run the application :
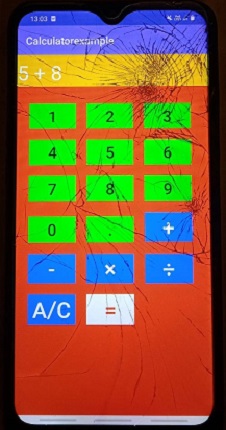
After connect your phone to computer via USB cable (data cable), you can run the app on your phone using the green “Run” button in the Android Studio IDE. Now, the app will be installed and launch on your device. You can see your calculator app on your android phone like this image.
Conclusion :
Finally, you have learned how to create a simple calculator application using Android Studio IDE. This is a basic calculator app. You can make it more complex and realistic by add your own logic and code. Thank you for visiting my site.